Optical Experiment
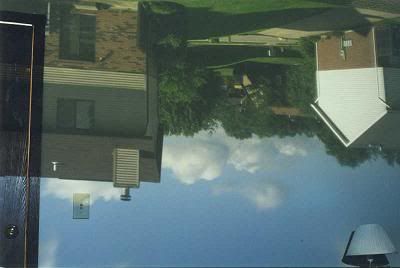
This post will explain how to easily make a room sized camera obscura by placing a lens on a window and having the outside view projected onto the opposite wall, as seen below:
Carboni's "The sky in a room" site explains this experiment and how to mount the lens on shutters. His plans look like they would work great, but if you don't want to spend very much money or if you would like to see it first before permanently attaching shutters, there is a less expensive option.
What I did was cover the entire window with poster board to block all light from entering the room, cut a 1" diameter hole in the poster board, and then taped the lens over the hole.
A blank lens can be purchased from an optician at a store that sells eye glasses. Depending on the size of your room, you may need to have it ground to the appropriate size, as described on Carboni's site.
Miscellaneous notes:
Before asking the optician to grind the lens, try it on the window first, the one that I bought worked great without modification.
It will look better if you use white poster board with white duct tape, or black poster board with black duct tape.
Keep in mind that the landscape will be upside down as seen projected on the wall.
The effect works well on sunny days, and not very well when it's cloudy.
The best use for this is probably if your window faces the east, so you can see the sunrise on your wall when you wake up.
The room needs to be totally dark except for the light entering through the lens.
In the afternoon, it will look a little better after your eyes have had a few minutes to adjust.
Also it's best if the window faces a view with some activity, it can be entertaining to see cars moving and people jogging upside down across your wall.
If the image doesn't seem bright enough, it will help to mount a small box over the lens. The box should be open at the top and have a hole in the bottom sized to allow light to fall on the entire opposite wall, but to block light from falling on the other two walls, the floor, and the ceiling. This will limit the amount of light in the room and make the image appear brighter. Or instead of a box, you could taped some folded pieces of paper next to the lens to block the light.
Probably a good idea to clean the window inside and out to be sure that you get the maximum amount of light possible.
Viewed from up close, the image on my wall is not perfectly in focus, but as you can see in the photo, if you step back it looks decent.
-----
Back to What is it? - Unusual objects
posted by Rob H. at
5:09 PM
![]()

20 Comments:
I am happy to see others have an interest, you can make a room sized pinhole camera obscure as well without the lens but with a tiny hole, the image isn't as clear but it works. As I understand the history of photography the origional camera (latin:room) was just that, it was likely created by accident with a small hole in the drapery and an inverted image projected on the other side of the room.
By Anonymous, at 8:01 AM
would it be possible to use 2 lenses so the image is not inverted on the wall?
By Anonymous, at 9:18 AM
Cuban photographer Abelardo Morell has done some great photos based on whole-room camera obscura. I just saw an exhibit of them last summer at the Art Institute in Chicago. It's amazing how such a simple technique can create mind-blowing results! You can see some of his photos on his website here: http://www.abelardomorell.net/camera_obscura1.html
Thanks for the instructions--I would definitely love to try this myself!
By JaneFan, at 1:49 PM
>...you can make a room sized pinhole camera obscure as well without the lens but with a tiny hole, the image isn't as clear but it works.
Yes, when I remove the lens the image is still there, but as you mention, it's out of focus.
>would it be possible to use 2 lenses so the image is not inverted on the wall?
I don't think that would work, but if I get another lens I'll give it a try.
>Cuban photographer Abelardo Morell has done some great photos...
Thanks for the link, he has some excellent photos on his site.
By Rob H., at 2:35 PM
Hello! I'm very impressed with what you have achieved. What size of lens did you use and have you progressed any further? I look forward to hearing your reply!
Ebonyian
By Ebonyian, at 2:23 PM
>What size of lens did you use and have you progressed any further?
The lens was about 3" diameter, but it was placed on a 1" hole in the poster board that was covering the window. I've done this on a couple different windows, but besides that I really haven't done more with it.
By Rob H., at 3:28 PM
Hello I´m a brazilian art student. I´m working on a portable camera obscura with friends and now we´re trying to find the appropriate lens, because we want to interact with people and we want to improve the image to astonish them... Our city doensn´t have any science museums and in the perifery there aren´t cultural options.
We don´t want to change the orientation (inverted) of the projection.
Is the lens biconvex? The
tent is cilindrical with a diameter of 2,30 m. How I calculate the dioptry? Is it negative or positive?
By Anonymous, at 5:36 PM
The lens that I use is not biconvex. Take a look at this site to calculate the diopters:
http://www.funsci.com/fun3_en/sky/sky.htm
The diopters will be a positive value. Good luck with your project.
By Rob H., at 1:34 AM
Hi,
Thanks for sharing this. Your post helped me learn more about the obscura and amaze some students I taught in our homeschool co-op! You should have heard the squealing!
Was wondering if you might share how you photographed this picture, I've not had much luck taking a picture of my obscura, I would appreciate any tips you might have! thanks
By Amy in "The Neighborhood", at 9:04 PM
Glad to hear that you had success with the experiment. When I shot my photo I used an old style regular film camera and a tripod. I took five or ten photographs, and for each one I left the shutter open a different amount of time: 2 seconds, 5 seconds, 10 seconds, 20 seconds, 30 seconds, 60 seconds. I don't remember which one turned out the best.
By Rob H., at 3:20 AM
Would this work for different distances with an adjustable loupe such as a jeweler would use?
By Anonymous, at 5:20 PM
A loupe or magnifying glass works only for a very short distance, if you hold either one a few inches from a wall (that has a window directly across from it) you will see a much smaller version of the room sized camera obscura.
By Rob H., at 5:26 PM
I'm not sure what kind of lens to use. I found someone selling some vintage optical lenses on ebay that are kinda square but rounded. Would something like that work? I do this project with middle school students and they love it but I used a washer for the hole. I would like it to be more in focus.
By Anonymous, at 8:01 PM
For a lens we used some reading glasses, of course the focal point was only about 1-2 feet from the hole, but it was perfectly focused. We just held a piece of foam board a few feet in front of the hole. This wouldn't work well for a large class. The other thing I did was asked my eye doctor to donate a lens for our class and I made sure to send home some info. with advertising for his office. It worked pretty well.
By Amy in "The Neighborhood", at 8:40 PM
This comment has been removed by the author.
By Amy in "The Neighborhood", at 8:41 PM
>I'm not sure what kind of lens to use. I found someone selling some vintage optical lenses on ebay that are kinda square but rounded. Would something like that work?
I don't know if that would work or not. A blank lens can be purchased from an optician at a store that sells eye glasses. Depending on the size of your room, you may need to have it ground to the appropriate size, as described on Carboni's site.
By Rob H., at 1:05 PM
Nice post thanks
By Erik Erlangga, at 10:27 AM
Do you need photographic paper on the walls to get an image? Or will it show up on any wall? :)
By Anonymous, at 4:43 AM
It will show up on any wall, no photographic paper is needed.
By Rob H., at 4:24 PM
Really enjoying every little bit of it and I have you bookmarked to check out new stuff you post.
By Web Hosting India, at 8:59 PM
Post a Comment
<< Home